Showing posts with label airfryer. Show all posts

Saturday, September 17, 2016

Home Made Luncheon Meat

I had been rather lazy recently and have not been updating the blog as often as I used to. But I guess I can't miss this recipe out. Made this specially for a friend that is currently pregnant and craving for luncheon meat.


Ingredients:

  • 500g pork minced (I used ready store minced and I have no idea the fat vs lean composition)
  • 100g pork belly (rind removed) - cut to small pieces
  • 30g chicken (coincidentally got left over)
  • 30g plain flour
  • 30g potato starch
  • 1tbsp sugar
  • 2tbsp soy sauce
  • 1tbsp sesame oil
  • 1tsp ginger juice (I can't squeeze that much so actually just shred some into the mixture)
  • 1tbsp chinese cooking wine
  • 1tsp paprika
  • 1tsp 5 spice powder (I think it is rather over powering, should reduce to max 3/4tsp should do)
  • 1tsp white pepper powder
  • 2 egg whites
  • 1/2tsp salt
Steps:

  1. Place the cut pork belly in the food processor and blend till the meat are finely blended. 
  2. Add in the chicken and minced into the food processor and blitz it for roughly 10-15seconds. This is to further processed the meat till they are very fine so that the texture of the luncheon meat is not coarse.
  3. Add in the rest of the ingredients and blitz for another 20seconds to get all ingredients mixed properly and evenly.
  4. Prepare either a bowl or pan or whatever container that you will want to use to steam the meat. Oil the container and place the mixture into the container. Press the meat down and try to compact it as much as you can. It is rather hard to do this since the mixture is very bouncy and soft. I just used the back of the spoon to press it down. 
  5. Oil the top of the mixture and then cover the container with an aluminium foil. Then use your hand to further compact the meat down by pressing over the foil.
  6. Prepare a wok of water and set to steam the meat. I used the Philips electrical pressure cooker and just pour in cold water and put in the container. Use something heavy to place at the top of the aluminium foil. This is to prevent the meat from expanding during the steaming process and create air bubbles in the luncheon meat.
  7. If you are steaming it manually, steam over high heat for 45mins. With the pressure cooker, I used steam mode and steam for 20mins.
  8. Once done, removed the container and let it rest. Do not remove the aluminium foil. This is to ensure that all the moisture can be retained in the meat and not have juices flowing out when you cut it. Since the weather is  rather cold still tonight (I guess it is below 11c), I waited for bout 15mins before opening and removing the whole piece of meat to cut (rested another 10mins out of the container before cutting).
  9. Fry the meat the way you like or like me, place it in the air fryer at 180c and fry for 7mins on each side.


Monday, August 8, 2016

Sourdough Chocolate Brownies

As the sourdough starter is being fed, it gets more and more and I need to use it or discard it. As usual, I try to avoid wasting so I googled up for some usage and decided to make brownies with it instead.

Ms No 2 loves it so much coz it is all chocolate... yum


Ingredients:

  • 170g dark chocolate chips
  • 113g unsalted butter, cut into small pieces
  • 80g sugar
  • a pinch of salt
  • 1tsp vanilla 
  • 1 egg
  • 20g cocoa powder (I used milo coz my girls love it)
  • 113g of matured sourdough starter (I used it on the 5th day)

Steps:

  1. Place the chocolate and butter in a microwave safe bowl. Heat it up at high for about 1min.
  2. In a separate bowl, mix the cocoa powder and sugar. Then stir in the chocolate and butter mixture.
  3. Next stir in the egg followed by the sourdough starter and the rest of the other ingredients.
  4. Lightly greased the baking pan and pour the mixture into it.
  5. If baking in the air fryer, just bake for bout 20mins on 180c. If using normal oven, preheat the oven at 200c. Then bake for 30-40mins. The outer layer of the brownie should be set but still looks wobbly.
  6. Let it cool before removing to cut and serve.


Tuesday, July 12, 2016

Keropok Lekor aka as Malay Fish Fingers


This is oil fried version


This is air fried version


This is how it looks like before slicing to fry

What happens when you are in the land that you don't get what you crave for easily or almost not available, you try making it yourself. Keropok lekor is one of my favourite snack from the night market back home. This is actually my second attempt of making this snack. The first was a failure maybe due to the type of fish used. I used basa fillet the first time and it tasted more just like normal fish cake and lack of that spongy feel for the thick type and not crispy for the thin type.

This time, I used barramundi and it works nicely. Maybe it is due to the "kaoness" of the fish. It is the stickiness effect that the fish achieve after being mashed.

Here is the recipe for this yummy snack:


Ingredients:

  • 450-470g of fish fillet (I used barramundi, you can use tuna or even ready made fish paste
  • 1 1/4 cups of tapioca starch
  • 1/4 cup of plain flour
  • few pieces of ice cubes
  • a pinch of salt
  • 10g butter
  • 1cup plain flour for dusting
  • 1 pot of salted water for boiling
  • oil to fry
Steps:
  1. Place the 6 ingredients in the food processor. Mix till it is even.
  2. Dust the working top with plain flour and scoop the mixture out to shape.
  3. Divide the mixture into 6 parts and dust it generously with the plain flour.
  4. Shape it into long tube of roughly 12cm with diameter of 2.5cm. Place them aside.
  5. Boil the salted water. Once boil, place in a few pieces of the fish tubes and let it boil for bout 4-5mins. It is ready once the tube floats in the water.
  6. Remove the fish tubes and let it dry and cool down.
  7. Once it is cool and dry, slice it to the thickness of your preference and fry.
  8. If you using the air fryer, it takes about 8-10mins at 200c. Time varies with the thickness you cut the cracker.

Sunday, June 26, 2016

Ayam Percik


After hub has his craving for nasi goreng kampung, it is my turn to crave for ayam percik. When I was young, I'll anticipate for the days of the night market and this is the only thing mom will let me buy. Haven't had it for years and just feel like eating it.


But there is no night market here. So, the only way is to make it myself. Worse, the winter cold is catching up and there is no way to do it with the bbq at even 5pm coz it is already dark by then. So, I resorted to my beloved AF to do the job.


Ingredients:

  • 6pcs of chicken drumstick, deboned (you can either buy one that's ready or do it yourself)
  • 2tsp tamarind sauce
  • 2lemon grass, bruised
  • 3/4 cup water
  • 3/4cup thick coconut milk
  • 1.5tbsp sugar
  • 1/8 tsp salt
  • 3tbsp oil
  • Marinate ingredients:
    • 1/2tsp salt
    • 1tbsp sugar
    • 1tsp chilli powder
    • 1tsp turmeric powder
  • Ingredients to blend:
    • 4 candlenuts
    • 6 cloves of garlic
    • 8 dried chilli, soaked in hot water
    • 2cm ginger
    • 4 shallots
    • 2.5cm galangal

Steps:

  1. Clean the chicken and pat it dry. Marinate the chicken with the marinate ingredients and set it aside to marinate for at least 30mins.
  2. Place the ingredients to be blended in the blender and blend till fine.
  3. Heat up the oil in the pan and then saute the blended ingredients along with the tamarind sauce and lemon grass. Fry for about 4-5mins till it is well blended. and fragrant Stir constantly to avoid it from burning. Next add in water and let it simmer for 2mins.
  4. Add in the coconut milk and salt and stir till it thickens.
  5. Place the chicken into the cooled down spices and cover the chicken with the spices. Place the chicken in the Air fryer. Scoop a tablespoon of the spices on top of the chicken and set to 200c for 7mins.
  6. Flip the chicken over and scoop another tablespoon of the spices on top of it and set to 200c for another 5mins.

Saturday, June 25, 2016

Malay Style Briyani Chicken


I love the biryani we get back in Malaysia and the one I had prepared earlier with the ready mix spices just don't taste nor looks anywhere near to that. This time, I decided to try out the recipe that calls for the preparation from scratch instead and yum... it does taste superbly good. Just be cautious that the list of ingredients may look really long.

I made it twice actually and once with chicken and the other is with beef rendang.

For the rice:

  • 3 cups basmati rice, soaked at least 30mins, then washed and drained
  • 1tbsp butter
  • 2 pcs shallot, slice thinly
  • 2 cloves garlic (I'm using Australia garlic that is rather huge, it comes out to roughly 3tbsp amount), minced
  • 1tbsp ginger, minced
  • 1/2tbsp cinnamon powder
  • 1/2tbsp cloves powder
  • 1tbsp cardamon powder
  • 2tsp tomato puree
  • 1/4 cup grated carrot
  • 2 pandan leaves, washed and knotted
  • 2 cups water
  • 2 cups evaporated milk
  • 1/4tsp numeric powder
  • 1/4 cup raisins
  • 1/4 cup of cashew nuts (I used pine nuts coz i don't have cashew at that time)
  • 3tbsp chopped coriander leaves

**Note: I don't have cardamon powder so what I did was use the grinder and grind it to powder form. You may choose to place the entire cardamon, cinnamon or/and cloves in as in original form but it taste better once it is grounded to powder form


  1. Heat the pressure cooker up, put in the butter and shallot. Slightly saute before adding in the spices.
  2. Next add in the tomato puree and carrot and stir.
  3. Add in the pandan leaves next and stir till fragrant (roughly a min) before adding in the rice,  water and evaporated milk.
  4. Switch the cooker to risotto mode (KPT13mins) and leave it to cook.
  5. Once done, remove and add in coriander leaves, raisins and nuts. Next fluff the rice and mix the new add on stuff evenly.


For the chicken:

  • 6pcs of drumstick, marinate with minced garlic (1cloves), ginger (1cm) and 1tsp apple cider vinegar
  • 1tsp oil
  • 4 shallots, sliced
  • 1.5tbsp minced garlic
  • 1.5tsbp minced ginger
  • 1/2 cinnamon stick
  • 2 cardamon pods
  • 4pcs of cloves
  • 1/4 tsp pepper
  • 3/4 tsp fennel powder
  • 3.4 tsp turmeric powder
  • 2 knotted pandan leaves
  • 2tsp coriander powder
  • 1tsp chilli powder
  1. Clean the chicken and wipe it dry. Marinate it with the marinate ingredients for at least 30mins.
  2. Place the chicken in the air fryer and set at 180c for 5mins.
  3. Heat up some oil in the pressure cooker pot and saute the shallots, garlic and ginger.
  4. After the shallots soften and it starts to give nice aroma, add in the cinnamon stick, cardamon, cloves, fennel powder, turmeric powder, coriander powder, chilli powder and pandan leaves. Stir for 1-2mins.
  5. Then add in the chicken and set the pressure cooker to meat mode and KPT for 15mins.


For the beef:

  • a piece of beef tenderloin roughly 400g, cut to cube (roughly 1"x1")
  • 1tsp salt
  • 1/2cup evaporated milk
  • 1/8cup of desiccated coconut
  • spices to blend
    • 3 shallots
    • 2 cloves of garlic
    • 3tbsp of blended chilli
    • 2tsp of belacan powder
    • 1cm ginger
    • 1tsp turmeric powder
    • 1 lemongrass stem, cut to small pieces the end part (the top part bruised and leave aside)
  • 2 kafir lime leaves, sliced finely
  • 1 handful of vietnamese mint
  • 2tbsp oil
  1. Blend all the ingredients for the spices together till it forms a thick paste. If too hard to blend, add a little water (like a teaspoon or more or less).
  2. Heat the pressure cooker and add in the oil to the pot. Fry the spices ingredients till fragrant.
  3. Add in the desiccated coconut and fry for another 2mins.
  4. Then add in the beef and coat it well with the spices. Set the cooker to meat mode and cook for 15mins.
  5. Once released pressure, add in evaporated milk and salt and cook under high saute mode for 8-10mins till the sauce thicken to your preferred thickness.
  6. Once done, turn off the power and stir in the kafir lime and vietnamese mint leaves.


For the pickle:

  • 1 whole cucumber
  • 1 whole carrot
  • 4pcs of shallots
  • 1tsp salt
  • 1cup rice vinegar
  • 2tbsp sugar
  1. Cut the cucumber to roughly 3cm length, 1cm thickness size. Removed the core.
  2. Season it with the salt and leave it aside for at least 10mins before washing off.
  3. Cut the carrot to the same size as the carrot.
  4. Slice the shallots finely.
  5. Heat up the vinegar and melt the sugar in it.
  6. Once the mixture cool down, place the carrot, cucumber and shallots in it. Set aside to marinate for at least 30mins before placing it into the fridge.
**Note: You can top up the veggies with the same liquid if they are still there after you finish up the veggies.

Monday, June 6, 2016

Milo Nutella Cake

Last Friday was my princess no 2's birthday and I decided to bake a cake with all her favourite stuff on it, Milo and chocolate as per her request. And this time, I used the air fryer to bake it. It cuts the baking time a lot lesser and I made a small cake so that we can finish it up within the day or next.

I had also used up the home made nutella.


The decorations are edible and made by my neighbour. I just need to arrange and stuffed it on the cake top.


The inside is so moist still with a little lava.

Ingredients:

  • 60g butter (soften)
  • 99g plain flour
  • 1g baking powder
  • 2 eggs
  • 60g sugar
  • 50g milo
  • 50g nutella
  • 10g milk
Steps:
  1. Line the baking tray with paper.
  2. Put all ingredients in the mixing bowl and mix on medium speed till all well mixed.
  3. Pour the ingredients in the baking tray and give it a shake to remove any air bubbles.
  4. Preheat the air fryer for 4mins at 180c.
  5. Then place the baking tray in the air fryer and bake for 20mins at 160c.
  6. Take it out to cool before removing from the tray. The cake will rise with a dome after baking and subside once cool down.
  7. Decorate with your favourite topping or cream or chocolate ganache.


Thursday, May 26, 2016

Chickpeas Pumpkin Soup

Getting bored with the normal meals and wanted something special for lunch today and at the same time need to finish up the pumpkin before it spoils, and tada... roast pumpkin soup with chickpeas cooked using the pressure cooker.


Ingredients

  • 1/4 cup chickpeas, soaked for at least 30mins, washed and drain
  • 5tbsp of puy lentil, soaked for at least 30mins, washed and drain
  • 1 cup of water
  • 150-200g of pumpkin, sliced
  • 1/4 cup of chopped onion
  • 1 tbsp butter
  • 1/2 carrot, cut to coarse pieces
  • 1/2 cup milk
  • 1cup meat broth (mine is the one I had made for ramen, left over, or you can use vegetable stock or chicken stock)
  • 1/4 cup chopped bacon
Steps:
  1. Place the chickpeas, lentil and water in the pressure cooker and use manual mode to cook for 5mins. Once done, drain off the water.
  2. While the chickpeas and lentil are cooking, place the bacon on some aluminium foil and place it in the air fryer. Also line the pumpkin slices in the air fryer. Set it at 180c for 8-10mins.
  3. In either a pan or in another pot, saute the onion with the butter. If using pressure cooker, use the high saute mode.
  4. Next blend the onions with the pumpkin.
  5. Finally, add in all the ingredients except bacon into the pressure cooker. Set it to manual modem KPT for 2mins.
  6. Once ready, served with the air fried crispy bacon.
** Note: I have not use any seasoning but if you like, you may sprinkle some cumin powder and paprika in step 5. There is no need for salt as it is already very flavoursome.

Tuesday, May 10, 2016

Squid Stuffed with Glutinous Rice

Had made stuffed squid with minced previously and dont quite work so nicely and remember seeing some recipe using glutinous rice. Hence, tried making it since I have some glutinous rice left.


Ingredients:
For the stuffing:

  • 1cup of glutinous rice, pre soaked with hot water for bout 20-30mins
  • 1 big clove of garlic, minced
  • 1 small shallot, chopped finely
  • 3/4 cup of fresh button mushroom (can be substituted with dried shitake or canned button mushroom), sliced to thin pieces
  • salt and pepper to season
  • 1tbsp of oil
  • 1 cup of water
For the sauce:
  • 3tbsp of soy sauce
  • 1tbsp of sugar
  • 1tbsp miri
Other ingredients:
  • 3 cleaned nice big tubes of squid


Method:
  1. Heat oil in the the pressure cooker using saute high mode. Add in the shallot and saute till almost golden before adding in the garlic and saute.
  2. Next, add in the mushroom and saute till it is soft and add in the rest of the ingredients.
  3. Choose risotto mode that has KPT 14mins time.
  4. Once the rice is ready, let it slightly cool before stuffing it in the squid. Seal off with a tooth pick.
  5. Place the stuffed squid in the air fryer, 180c for 12mins.
  6. While the squid is cooking, place all the sauce ingredients on the pan and cook it till it is a bit thicken.
  7. Once the squid is done, place it on the sauce and coat it all over with it.
  8. Ready to serve. If you like, u can cut the squid up a little.. :D

Thursday, April 21, 2016

Chocolate Lava Cake

Had been wanting to bake this chocolate lava cake for quite sometime but just too lazy and then when I'm in the mood, then I realised that the air fryer is in the dishwasher.

Finally, yesterday the MKR contestants bake this for their dessert and ok, I'm making it today.


Do note, I spent less than 20mins for the entire thing (taking out ingredients to the point of popping them into the mouth).

Ingredients

  • 100g dark chocolate
  • 100g butter
  • 50g castor sugar (can reduce if you don't like it that sweet though this is just right I think)
  • 19g plain flour
  • 1g baking powder
  • 2 eggs

Steps:

  1. Place the chocolate and butter in microwave safe bowl and melt them in the microwave on medium temp for bout 1.5mins
  2. While the butter is melting, whisk the eggs and castor sugar till it is pale and frothy.
  3. Stir the chocolate and butter till it is even and add in to the egg mixture. Then sift in the flour and baking powder.
  4. Gently mix the mixture with a spatula till mixture is even and the flour is well mix.
  5. Preheat the air fryer for 2mins at 180c
  6. Grease the ramekin with butter. Pour the mixture to the ramekin till is it 3/4 full.
  7. Bake at 180c for 8mins.
* Note: I have not tested it on the oven and hence no idea how long time it is required but I suspect it may need maybe a min more.


Look at the lava that's oozing out


Sunday, April 17, 2016

Flaky Curry Puff

This is not the first time I made curry puff, but this is the first time I attempted the so called karipap pusing style of puff, the pastry is so flakey and crispy.

As usual, I'll attempt both the oil fried version as well as air fried version.

This is the  oil fried version.

This is the air fried version

And since we ran out of potato to make a big batch of filling, we had baked beans cheese filling and tuna cheese filling for a twist.

Since I had posted the basic karipap recipe earlier, I'll just skip the filling recipe here and go straight to the pastry only.

For the filling recipe, refer here.

Ingredients:

  • Water dough
    • 360g plain flour
    • 150g cake flour/low protein flour
    • 1tbsp caster sugar
    • 2tsp salt
    • 150g butter, cubed
    • 200ml water
  • Butter dough
    • 250g cake flour/low protein flour
    • 150g butter
Steps:
  1. First, put all the ingredients (except water) for the water dough in the food processor and whizz them up. Slowly add in the water. It will looks a little like bread crumb texture once everything is well mix. Pour them out and knead into a dough. That should take roughly 2mins. Set aside
  2. Next, put in the ingredients for the butter dough in the food processor and do a quick whizz to let the butter mix with the flour. It will be very very crumbly texture. Pour them out and knead into a sticky dough. That will take about 10-15mins. Set aside along with the water dough in the fridge for about 10-15mins, covered.
  3. Take the dough out and roll the water dough out till large rectangle and sprinkle generously with flour. I rolled mine to roughly the size of 8cm by 16cm.
  4. Then roll the butter dough out to roughly half the size of the water dough. Place it on top of the water dough. Fold the water dough over and cover the butter dough.
  5. Then roll the dough out again and fold over again. Do this another time before rolling out the dough into a long roll.
  6. Cut it into small sizes (I think I cut up to 20pcs).
  7. Roll out the small pieces into round flat pieces, fill up with the fillings that you had prepared and cool down and shape as per your preference.
*You may either fry in oil or the air fryer for 15mins at 180c.
* You can also store in freezer in pieces to maintain the shape for 10mins before transferring into the bag for storing.


Saturday, April 16, 2016

Cheese Mochi aka pão de queijo


I had baked this 2yrs back with the air fryer and decided to do it this time with the oven instead.

It is a nice yummy snack for both adults and kids, very little ingredients required and easy to make. It has a crunchy outer texture and soft fluffy internal texture.


Ingredients:

  • 2 large eggs
  • 2/3 cup olive oil
  • 1 + 1/3 cup milk
  • 340g tapioca starch
  • 200g cheese (any shredded cheese either parmesan, cheddar, mozzarella, or a mixture of them)
  • original recipe asked for 2tsp salt which i omitted
Steps:
  1. Preheat oven at 200c (if fan forced, 180c). 
  2. Place all ingredients in the blender and blend till it is well mix.
  3. Scoop the mixture into oiled muffin tray (if silicon type, can omit the oiling part). For air fryer, I used muffin cup.
  4. Bake at for 20mins (for air fryer, bake at 180c for 9mins).


Tuesday, March 29, 2016

Hakka Lei Cha

Hakka Lei Cha is one of my favourite dish. It is packed with lots of healthy fibre from various vegetables and the yummy green tea soup.

Another best part of it is I get to use some home grown harvest like basil, parsley and mint from my garden.


Ingredients:
For the soup:

  • about 3/4cups of dried anchovies, washed and drain
  • 2l water
  • one big handful of basil, roughly 1.5cups (not pushed down, but just put on the cup to measure) 
  • a small bunch of mint, after chopped should be roughly 1/4 cup amount
  • 3-4 sprigs of parsley
  • 1/4 cup of peanut (roasted)
  • a small handful of tang-o veggie if you like it to have a little bitter taste
  • 2 tbsp of green tea powder (i used japanese green tea)
  • 1/8 tsp salt
Other ingredients:
  • 2cups of rice - cook like normal
  • 3 big cloves of garlic (I'm using local Perth grown garlic that's currently in season and very fat)
  • 3/4 Australia leek, sliced finely
  • 5 snake/long beans, cut to small cubes
  • 3/4 carrots, julienne
  • 1/2cups of finely sliced cabbage
  • 300g sweet potatoes shoot (mine is home grown too)
  • 3tbsp pickled radish, washed
  • 3pcs of hard tofu or known as tau kua
  • 1/4 zucchini, julienne
  • 3pcs of fresh button mushroom, cut to thin slices
  • 3tbsp oil to saute
Steps:
  1. Place 1/2 cups of the anchovies and water in a pot and boil for roughly 15-20mins. I used the pressure cooker to do this and kept pressure for 4mins. Removed the anchovies and place it in the air fryer along with the balance of the anchovies and AF at 180c for 7mins. If you don't have an AF, just use a non stick pan to fry it (without oil) till it is all crispy.
  2. Place all the rest of the ingredients along with the fried anchovies in a blender and blend till it is as smooth as you can get. Add in some of the stock if required as the mixture can be too dry and a bit hard to blend.
  3. Pour in the mixture into the stock and let it get into boil and set it aside. That should be about 2-3mins.
  4. AF the tau kua at 200c for 3mins, or slightly pan fried it with a little oil. Set aside.
  5. Heat a little oil and saute the garlic (divide the garlic to 8 portions for those veggies) and fry the veggies separately. Set them aside.
  6. When you want to serve, just place the rice on the bowl, scoop the veggies around the rice and pour in the soup stock to serve.
Note:
  • The veggies may vary depending on your preference or seasonal availability. Some also serve with toasted sesame seed and/or peanuts.
  • For those who are allergic to peanuts may consider substituting with pine nuts (if you are not allergic to it).
  • My first attempt of making this dish, I used pesto sauce instead coz I didn't have basil with me. If you are using pesto sauce, omit the basil and peanuts.

Monday, February 29, 2016

Air Fried Chicken Balls

Instead of making nuggets, I decided to make some nice simple yummy chicken balls for the kids for their dinner and the extras for the big girl to bring to school on the next day.


Ingredients:

  • 1 pc of chicken breast (roughly 150-200g) - cut to small fine pieces, but not mince so you still get the chicken slices texture
  • 1/4 onion - chopped roughly, to get the crunchy texture too
  • 1/2 tsp of garlic powder
  • a dash of pepper
  • a pinch of sea salt
  • 1tsp of corn flour
  • 2 slice of bread (blend till powder)
  • 1/2 cup of plain flour
  • 1egg - beaten

Steps:
  1. Marinade the chicken with the onion, garlic powder, pepper, sea salt and corn flour. Leave it aside while you blend the bread, prepare the flour and egg.
  2. Scoop a tablespoon and then shape them into balls.
  3. Dip the balls into plain flour, egg and finally the bread crumbs. Make sure you follow the right order.
  4. Place them in the air fryer. Set at 160c for 6mins.
  5. Done, serve with your favourite sauce.

Sunday, February 21, 2016

Sweet Potato Balls stuffed with Nian Gao

Hub and the girls are not a fan of the traditional yam and sweet potato sandwich with nian gao, so I have to prepare something different. And I remembered I had made some sweet potato puff balls before and this time, I'll just stuffed it with the sticky cake instead.

This recipe uses tapioca flour instead of glutinous rice flour.


Ingredients:
  • 230g sweet potato, steamed (I microwaved with water) and mashed
  • 150gram tapioca flour
  • 50g rice flour
  • 15g corn flour
  • 25g sugar
  • a pinch of salt
  • 2tbsp oil
  • 1/4 cup of water
  • oil to spray
  • nian gao cut to small cube, roughly 1.5cm size, recipe for nian gao is here
Steps:
  1. Mix all the ingredients except the sticky cake and knead till it forms a soft dough.
  2. Once it is ready, scoop roughly a big tablespoon of it out and flatten it. Put a cube of the sticky cake and wrap it up, shape into a ball.
  3. Place the balls in the air fryer and set at 160c for 5mins.
  4. Then spray some oil on the balls and shake it around so that it is well coated and AF for another 5mins. Do not stuff too many balls into the basket to avoid them from sticking together.
  5. Once ready, take it out to cool but do not stack them up yet as this will deflate the ball.

Monday, February 1, 2016

Pumpkin Kaya / Jam


Something that's healthier yet taste yummy. This pumpkin jam goes well with bread and it is suitable for vegetarian that does not take egg.

Ingredients:


  • 400 grams of pumpkin
  • 2 Pandan Leaves
  • 50 grams of brown sugar
  • 100 ml thick coconut milk
  • 100ml thick cream
Steps:
  1. Instead of the normal steaming of the pumpkin, I roasted them on the air fryer to give it that extra nice flavour. So cut the pumpkin to small cubes and air fried them for bout 15-20mins on 160C. However if you don't have one you can just steam it till it is soft for the same amount of time.
  2. Blend the pumpkin with the cream and coconut milk. I used the hand blender. But if you have one, mash it and sieve thru it so that there is no clump in the mixture.
  3. Pour the mixture on top on non stick wok/pan/pot. Then add in the rest of the ingredients.
  4. Cooked on low fire (I'm lazy, I want it fast, so I started with slightly higher fire and once it gets heated and before it bubbles, lower down the temperature) till the mixture thickens and when you run a spoon over it, it draws a line on the mixture.
  5. Let the mixture cool down before transferring it to a clean, dry and sterilised container.

Sunday, December 6, 2015

Air Fried Churros


On Sat, hub wanted to ask us to go San Churros to get his birthday churros but then realised that the voucher is only valid a day before, the day or the day after the "big" day. So, we headed home instead... but I still wanted churros!

At the same time, I had wanted to try it out on my air fryer for a while (no deep frying at home)... so there goes, the attempt to try out since some other people has managed to do it.

Ingredients:


  • 225g water
  • 113g butter
  • ½ tsp vanilla extract
  • 2 tablespoons brown sugar (white if you don’t have brown)
  • ¼ tsp salt
  • 143g plain flour/ all purpose flour
  • 3 eggs, at room temperature (I used L size)

Method:
  1. In a small saucepan, heat up water, butter and brown sugar till the mixture starts to have a little bubble... stir constantly to avoid burning the bottom part of the mixture. Once it starts to bubble, lower the heat and in the flour.
  2. Stir with a spatula or big wooden spoon till the flour is mix evenly with the mixture and starts to cuddle up into a dough. Remove the saucepan from heat immediately and still give it some stirring.
  3. In a separate bowl, whisk the eggs, salt and vanilla  together.
  4. Then little by little mix into the cooked dough. Do not add too fast and mix too slow to avoid the eggs from getting cooked. Continue till the eggs are all mixed well into the dough. Set it aside to cool before putting them into the pipping bag. You may choose to use the star nozzle or just a plain big nozzle depending to how thick you want the churros to be.
  5. Preheat the air fryer at 180c for 2-3mins.
  6. Pipe the dough directly on the pan (it can be as closed as you like as it won't get any bigger than what you see). Turn the AF to 180c and bake for 8 to 10mins (check them after 8mins coz the bigger size one may take a little longer).
  7. If you will like to have it coated, have it coated with cinnamon sugar (combination of 1 part cinnamon to 1.5 part brown sugar). Coat it immediately once you remove it from the AF otherwise it won't stick.
Enjoy!

Monday, November 23, 2015

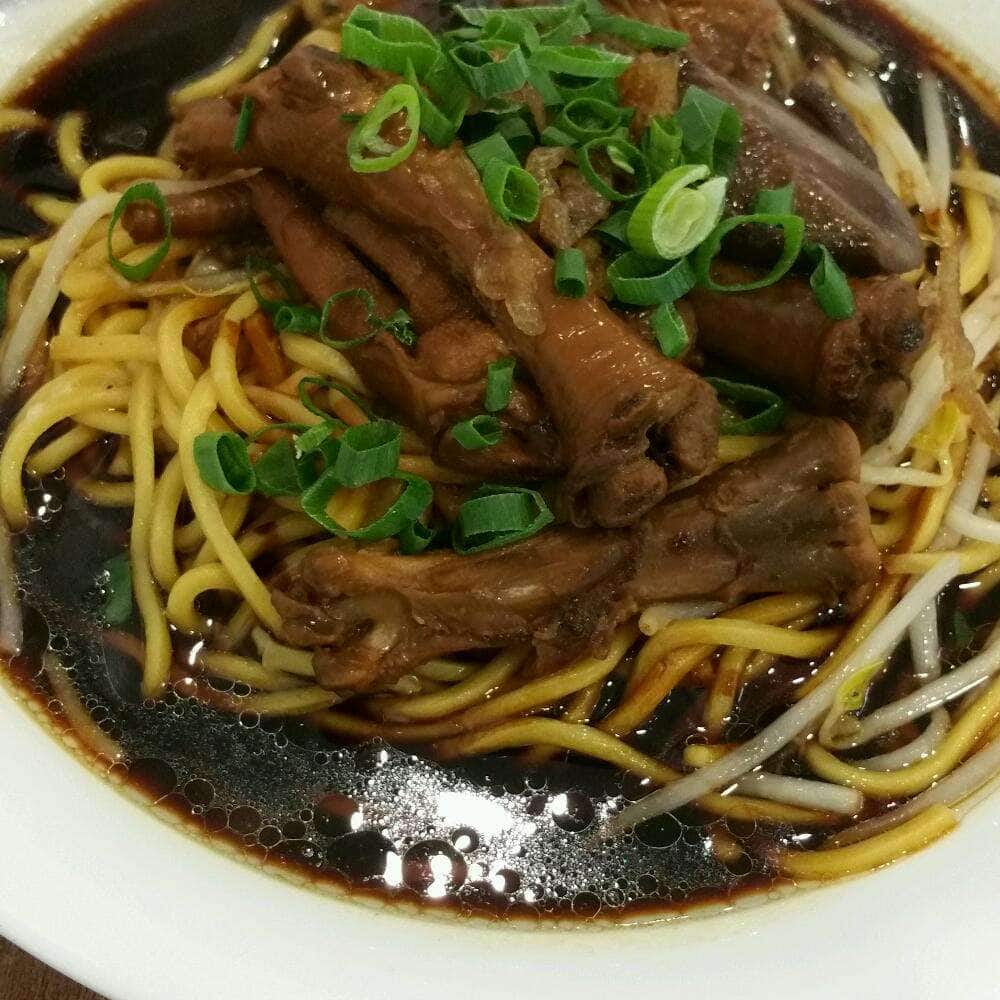
Braised Chicken Feet Mushroom Noodle

Recently I ordered mushroom chicken feet noodle at hubby's favourite cafe and not very happy with the chicken feet. It was not fried and does not give that wonderful texture and flavour it deserves. So I thought I should make this myself instead.

What more the shop charged $9.80 for it with yellow noodle only... hmmm...

See the photos below. The first two pics are mine and the last is from the shop.  Btw, I didn't serve that much sauce on mine coz was trying to reserve it for my girl for dinner later.. :D


This is the $9.80 one.


Ingredients:

  • bout 15 chicken feet, washed and nails area chopped off
  • 10pcs of mushroom, soaked
  • 2tbsp oyster sauce
  • 4pcs of star anise
  • 1tsp sesame oil
  • pepper
  • half cup soy sauce
  • 2tbsp dark soy sauce
  • 6cloves garlic, skin removed
  • 1tbsp oil
  • 6 slices of ginger
  • a small piece of palm sugar roughly the size of 2cm by 3cm by 1cm
  • a cup of water
Methods:
  1. Pat dry the chicken feet and air fry at 200c for roughly 15 to 20mins, Shake them in between. It is ready when it is golden brown color. Set aside to cool. The original recipe asked to have the fried chicken feet soaked in ice cold water to give that crinkle look but I skip that. And please note, the chicken feet discharge quite some amount of oil during the frying process, so do have a layer of paper lined underneath the basket or the pan of the AF prior to frying to avoid smoke from being discharge from the machine.
  2. Heat up the pressure cooker under saute high mode. Once heated, add in the oil, ginger, garlic and star anise. Fry for bout 30seconds or till the ingredients start to give nice smell.
  3. Add in the mushroom and oyster sauce and stir fry for another min.
  4. Finally add in the rest of the ingredients, cover the lid and set the pressure cooker to meat mode. That should keep the pressure for 15mins. At this stage, please note that the liquid should be sufficient to cover the chicken feet otherwise it won't be soft and flavoursome.
  5. Once the pressure valve drop, your chicken feet mushroom is ready to be served with either rice or noodle of your choice. 
Enjoy!


Tuesday, October 20, 2015

Curry Puff aka Karipap


Air Fried Version


Oil fried version

Bought some nice yummy curry puff from a fellow Malaysian last week but it was rather salty. So, I thought I'll make some myself so that I can control the flavour better. At the same time, was trying to see the difference of the fried vs the air fried effect on the puff.

I personally thinks that the oil fried one tasted better but hub can't really tell the difference (maybe coz he ate the cooled one while I had the hot one).

Ingredients:

Pastry:
  • 250g all-purpose flour
  • 50g rice flour
  • 50g tapioca or corn flour (I used tapioca)
  • 50g butter
  • 50g vegetable oil (out of supply, uses olive oil)
  • 130ml icy cold water + pinch of salt (i didn't use the salt, forgotten)


Filling:
  • 600g potato, peeled and diced (I used half potato and half sweet potato)
  • 1 large onion, diced
  • tbsps curry powder (for seafood)
  • 1 tsp tumeric
  • 2 tbsp vegetable oil
  • Some curry leaves
  • 1 cup water (+/-)
  • Salt to taste


Methods:

  1. Heat up the oil and salute the onion till it is translucent. 
  2. Add in the curry leaves and potato and slightly stir it around.
  3. Next add in the curry powder, turmeric and salt and stir the potato.
  4. Slowly add in the water, bit by bit till you reach the consistency you want, thick and the potato is soften. It should take about 7-9mins. Set it aside to cool.
  5. For the dough, mix all the flour together in a big bowl. Stir them around to mix it evenly.
  6. Heat up the butter and oil and once warm and butter melted, remove from heat.
  7. Pour the oil mixture into the flour and stir them till they mixed up properly. It should be crumbly.
  8. Next add in the cold water and knead the mixture till it forms a soft dough. Set aside and cover with a cloth and let it rest for about 15mins.
  9. Divide the dough to 24pcs and flatten them out, fill it with the fillings and shape as desire.
  10. For frying, heat up the oil and once you can see the oil movement, lower the temperature and fry till it is light brown.
  11. If Air Frying, AF at 180c for 14mins. Remember to spray some oil on the puff prior to "frying" it.

Monday, November 24, 2014

Air Fried Fluffy Cupcakes, with sliced banana and melted chocolates


Ingredients:

  • 2eggs separated (white and yolk)
  • 100g self raising flour
  • 80g sugar
  • 5g olive oil
Steps:

  1. Beat white till stiff peak. 
  2. Then beat the yolk and sugar (separate bowl) till creamy white. 
  3. Add in self raising flour, oil and mix well. 
  4. Fold in the egg whites into the mixture till the batter is well mixed.
  5. Scooped in the paper cups. I sliced some banana and push down the middle of the batter and put a piece of cooking chocolate on top, push it down. 
  6. Preheat air fryer at 160 for 2 mins. Bake for 7 mins at 170.


Thursday, October 30, 2014

Buckwheat Cupcakes

Bought a bag of buckwheat flour to make soba but gave up caused it needs to be fresh otherwise it will break. So, decided to try turn it into cupcakes.

Made two version with the same cake batter, top with dark chocolate chips and the other is shredded cheddar cheese.


Ingredients:
  • 155g soften butter (unsalted)
  • 3g baking powder
  • 100g self raising flour
  • 100g buckwheat flour
  • 50g yogurt
  • 100g sugar
  • 2 large eggs
  • toppings (mine was dark chocolates and cheddar, choose what u like)

Steps:
  1. Cream the butter and sugar till light and fluffy. Add in egg and mix well.
  2. Then mix in the self raising flour and buckwheat flour and baking powder. Mix it well.
  3. Finally add in yogurt and stir well.
  4. Scoop on the cups and top with the items you like. Bake for 15 to 20mins at 180c. I used air fryer and that requires 12mins at 160c.