Sunday, February 21, 2016

Sweet Potato Balls stuffed with Nian Gao

Hub and the girls are not a fan of the traditional yam and sweet potato sandwich with nian gao, so I have to prepare something different. And I remembered I had made some sweet potato puff balls before and this time, I'll just stuffed it with the sticky cake instead.

This recipe uses tapioca flour instead of glutinous rice flour.


Ingredients:
  • 230g sweet potato, steamed (I microwaved with water) and mashed
  • 150gram tapioca flour
  • 50g rice flour
  • 15g corn flour
  • 25g sugar
  • a pinch of salt
  • 2tbsp oil
  • 1/4 cup of water
  • oil to spray
  • nian gao cut to small cube, roughly 1.5cm size, recipe for nian gao is here
Steps:
  1. Mix all the ingredients except the sticky cake and knead till it forms a soft dough.
  2. Once it is ready, scoop roughly a big tablespoon of it out and flatten it. Put a cube of the sticky cake and wrap it up, shape into a ball.
  3. Place the balls in the air fryer and set at 160c for 5mins.
  4. Then spray some oil on the balls and shake it around so that it is well coated and AF for another 5mins. Do not stuff too many balls into the basket to avoid them from sticking together.
  5. Once ready, take it out to cool but do not stack them up yet as this will deflate the ball.

Nian Gao / Sticky Cake


This CNY, I had prepared something different from the previous year. No pineapple tart this year as I was too lazy to cut, blend and cook the pineapple for long time on the stove top. Not CNY cookies too, other than some Airfried crab stick and seaweed popiah crisps.

This is the special that I had made this year with my kitchen toy, the pressure cooker. Instead of the traditional way of steaming it for 3-4hrs, it now takes only 1hr in the pressure cooker.

Nian gal or the sticky cake is one of the nice stuff sold widely in the market during CNY. However, due to commercialisation, there are lots of "hanky panky" type in the market that I rather hesitate so decided to make it myself. Another reason it is expensive.

I had made two batch and think the second batch one tasted better and looks prettier too (btw the pic is from the first batch which is too pale and too soft). Here is the recipe:

Ingredients:

  • 300g glutinous rice flour 
  • 200ml water
  • 400g golden syrup (ready made from CSR)
  • 2tbsp oil
  • banana leaf (blanched in hot water to soften it)
Steps:
  1. Line the container that you will like to use to steam the nian gao with the banana leaf. I had used the container from the tiffin carrier. Make sure you have sufficient layer to avoid the liquid from spilling out and sticking on the container after steaming. Spray the banana leaf with a layer of oil to make it easier to remove when you need to serve the nian gao.
  2. Mix the water with the flour till it is well mix. The mixture will be quite hard as I had reduced the amount of water requested by the recipe. 
  3. Now add in the golden syrup into the hard dough mixture and get a little amaze at how it all liquified. The entire mixture will now be a thick liquid. Add in the oil and mix till it is all evenly mix.
  4. To avoid any lump, make sure you sieve the mixture.
  5. Pour the the mixture into the carrier that you had provided and place it into the pressure cooker.  I'm using the Philips pressure cooker and a stainless steel inner pot. I'm able to fit in two layers of the tiffin carrier into it. If you are not using the stainless steel inner pot, make sure you put a layer of cloth to avoid it from scratching. 
  6. Make sure the water level in the inner pot is at least half the level of the tiffin carrier's single layer. Set the pressure cooker to steam and KPT 59mins.
  7. Once done, let the valve drop, remove the container out of the pressure cooker. If there is any water that I had drip on the nian gao, make sure u wipe off the water and let it cool. Once cool, let it set in the fridge for at least 2-3days before you remove it from the container.

Monday, February 1, 2016

Pumpkin Kaya / Jam


Something that's healthier yet taste yummy. This pumpkin jam goes well with bread and it is suitable for vegetarian that does not take egg.

Ingredients:


  • 400 grams of pumpkin
  • 2 Pandan Leaves
  • 50 grams of brown sugar
  • 100 ml thick coconut milk
  • 100ml thick cream
Steps:
  1. Instead of the normal steaming of the pumpkin, I roasted them on the air fryer to give it that extra nice flavour. So cut the pumpkin to small cubes and air fried them for bout 15-20mins on 160C. However if you don't have one you can just steam it till it is soft for the same amount of time.
  2. Blend the pumpkin with the cream and coconut milk. I used the hand blender. But if you have one, mash it and sieve thru it so that there is no clump in the mixture.
  3. Pour the mixture on top on non stick wok/pan/pot. Then add in the rest of the ingredients.
  4. Cooked on low fire (I'm lazy, I want it fast, so I started with slightly higher fire and once it gets heated and before it bubbles, lower down the temperature) till the mixture thickens and when you run a spoon over it, it draws a line on the mixture.
  5. Let the mixture cool down before transferring it to a clean, dry and sterilised container.

Sunday, December 6, 2015

Air Fried Churros


On Sat, hub wanted to ask us to go San Churros to get his birthday churros but then realised that the voucher is only valid a day before, the day or the day after the "big" day. So, we headed home instead... but I still wanted churros!

At the same time, I had wanted to try it out on my air fryer for a while (no deep frying at home)... so there goes, the attempt to try out since some other people has managed to do it.

Ingredients:


  • 225g water
  • 113g butter
  • ½ tsp vanilla extract
  • 2 tablespoons brown sugar (white if you don’t have brown)
  • ¼ tsp salt
  • 143g plain flour/ all purpose flour
  • 3 eggs, at room temperature (I used L size)

Method:
  1. In a small saucepan, heat up water, butter and brown sugar till the mixture starts to have a little bubble... stir constantly to avoid burning the bottom part of the mixture. Once it starts to bubble, lower the heat and in the flour.
  2. Stir with a spatula or big wooden spoon till the flour is mix evenly with the mixture and starts to cuddle up into a dough. Remove the saucepan from heat immediately and still give it some stirring.
  3. In a separate bowl, whisk the eggs, salt and vanilla  together.
  4. Then little by little mix into the cooked dough. Do not add too fast and mix too slow to avoid the eggs from getting cooked. Continue till the eggs are all mixed well into the dough. Set it aside to cool before putting them into the pipping bag. You may choose to use the star nozzle or just a plain big nozzle depending to how thick you want the churros to be.
  5. Preheat the air fryer at 180c for 2-3mins.
  6. Pipe the dough directly on the pan (it can be as closed as you like as it won't get any bigger than what you see). Turn the AF to 180c and bake for 8 to 10mins (check them after 8mins coz the bigger size one may take a little longer).
  7. If you will like to have it coated, have it coated with cinnamon sugar (combination of 1 part cinnamon to 1.5 part brown sugar). Coat it immediately once you remove it from the AF otherwise it won't stick.
Enjoy!

Monday, November 23, 2015

Braised Chicken Feet Mushroom Noodle

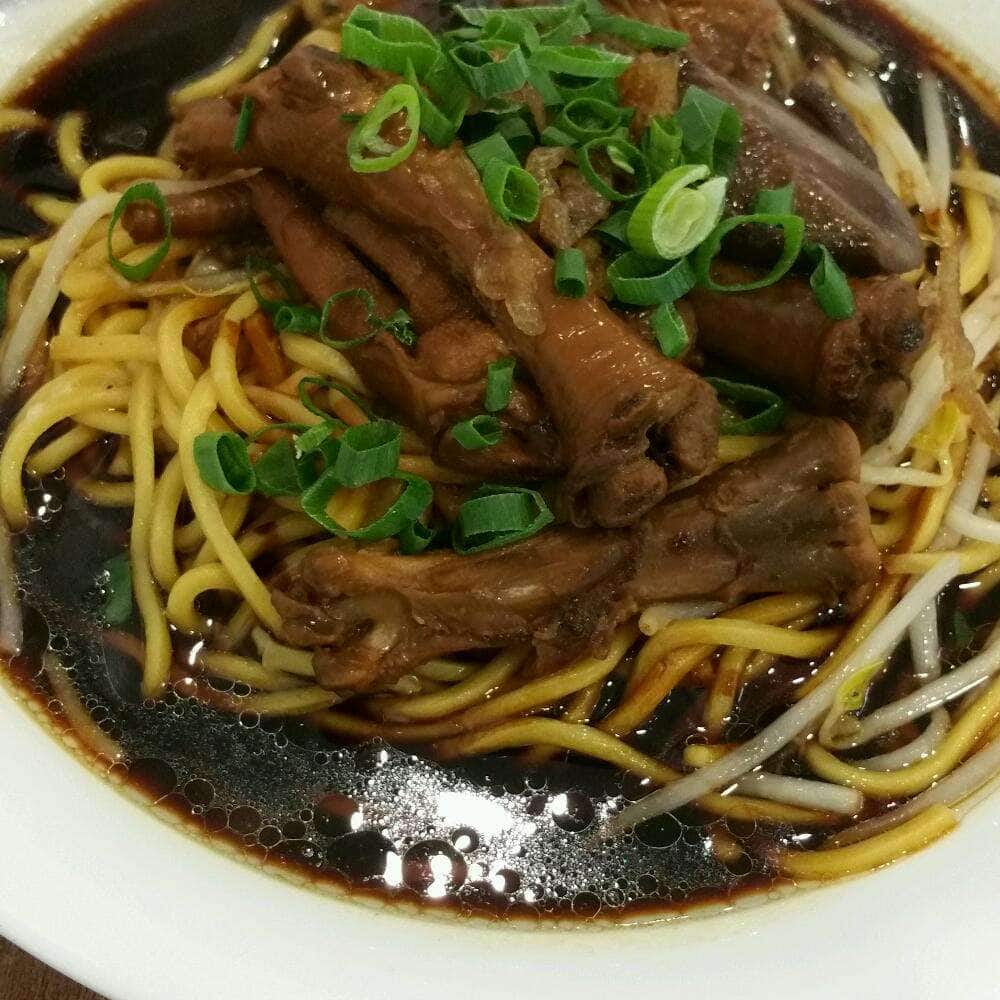
Recently I ordered mushroom chicken feet noodle at hubby's favourite cafe and not very happy with the chicken feet. It was not fried and does not give that wonderful texture and flavour it deserves. So I thought I should make this myself instead.

What more the shop charged $9.80 for it with yellow noodle only... hmmm...

See the photos below. The first two pics are mine and the last is from the shop.  Btw, I didn't serve that much sauce on mine coz was trying to reserve it for my girl for dinner later.. :D


This is the $9.80 one.


Ingredients:

  • bout 15 chicken feet, washed and nails area chopped off
  • 10pcs of mushroom, soaked
  • 2tbsp oyster sauce
  • 4pcs of star anise
  • 1tsp sesame oil
  • pepper
  • half cup soy sauce
  • 2tbsp dark soy sauce
  • 6cloves garlic, skin removed
  • 1tbsp oil
  • 6 slices of ginger
  • a small piece of palm sugar roughly the size of 2cm by 3cm by 1cm
  • a cup of water
Methods:
  1. Pat dry the chicken feet and air fry at 200c for roughly 15 to 20mins, Shake them in between. It is ready when it is golden brown color. Set aside to cool. The original recipe asked to have the fried chicken feet soaked in ice cold water to give that crinkle look but I skip that. And please note, the chicken feet discharge quite some amount of oil during the frying process, so do have a layer of paper lined underneath the basket or the pan of the AF prior to frying to avoid smoke from being discharge from the machine.
  2. Heat up the pressure cooker under saute high mode. Once heated, add in the oil, ginger, garlic and star anise. Fry for bout 30seconds or till the ingredients start to give nice smell.
  3. Add in the mushroom and oyster sauce and stir fry for another min.
  4. Finally add in the rest of the ingredients, cover the lid and set the pressure cooker to meat mode. That should keep the pressure for 15mins. At this stage, please note that the liquid should be sufficient to cover the chicken feet otherwise it won't be soft and flavoursome.
  5. Once the pressure valve drop, your chicken feet mushroom is ready to be served with either rice or noodle of your choice. 
Enjoy!


Tuesday, November 3, 2015

Glutinous Rice Wrapped in Lotus Leaf and Chicken Stuffed with Glutinous Rice Wrapped in Lotus Leaf


My neighbour had given me some lotus leaf that she had bought and I had been having it in the kitchen for quite sometime not knowing what to use it for yet. And then I bumped into this recipe in FB and thought of trying it out with a tweak.

With the pressure cooker, I actually don't need to pre soak the rice but since I need to get rid of the phytic acid, so, I soaked it for bout 3-4hours prior to using it.

Here goes the recipe:

Ingredients
  • 2pcs of lotus leaf, pre soaked with hot water
  • 1 small young chicken (mine is 1.2kg)
  • 2.5cups of glutinous rice, soaked for 3-4hrs
  • 2tbsp shiao thing wine for chicken marinate
  • 1tsp five spices powder for chicken marinate
  • a small pinch of pepper for chicken marinate
  • a big pinch of sea salt for chicken marinate
  • 1 chinese sausage, skin removed and diced
  • 2 pcs of chinese mushroom, reconstituted and diced (water used keep aside)
  • 3 pcs of dried scallop, soaked and water keep aside, shred to small pieces
  • 3tbsp dried shrimp, soaked, water disposed
  • 2 cloves of garlic, chopped
  • 1 big pc of shallots, sliced
  • 1/4 cup of carrot, diced
  • a small pinch of garlic powder for the rice
  • a small pinch of sea salt for the rice
  • a small dash of pepper for the rice
  • 4tbsp oil
  • some strings to tie
  • 3 pcs of big aluminium foil
Methods:
  1. Marinate the chicken and set it aside.
  2. Heat up the oil on the cooking wok. Once hot, add in the shallot and saute till it is almost brown. Add in the sausage and garlic and fry till fragrant. 
  3. Add in the carrot, mushroom, scallop and dried shrimp. Stir fry till the shrimp get crispy.
  4. Add in the rice and the water retained and stir fry till the water dry up. Season with the seasoning listed for the rice and stir for it to mix evenly. Leave it to cool.
  5. Stuff in as much rice as possible into the chicken cavity. Press it down and continue stuffing till it is full. Then use the string to tie the bottom of the drumstick to avoid the filling from falling out.
  6. Wrap the chicken with a layer of lotus leaf. Then wrap it with the aluminium foil to ensure no leakage and to maintain moisture. I had left mine to heat for few hours coz I was out for school pick up and the chicken is still moist and just right.
  7. Then place the rest of the rice onto the other piece of lotus leaf. Fold it up from the top, bottom then right and finally left. Tie the parcel up with the leftover string.
  8. Place 2 cups of water into the pressure cooker, then the aluminium foiled wrapped chicken and finally the rice wrapped in lotus leaf. Cover the pressure cooker's cover, set to bake mode (which is 45mins) and start. Remember to set the valve to bake mode.
  9. Voila, once pressure released, the food is ready to be served. :D
*Note: I'm using the Philips electric multi cooker which has the pressure cooker and bake mode.


Tuesday, October 20, 2015

Curry Puff aka Karipap


Air Fried Version


Oil fried version

Bought some nice yummy curry puff from a fellow Malaysian last week but it was rather salty. So, I thought I'll make some myself so that I can control the flavour better. At the same time, was trying to see the difference of the fried vs the air fried effect on the puff.

I personally thinks that the oil fried one tasted better but hub can't really tell the difference (maybe coz he ate the cooled one while I had the hot one).

Ingredients:

Pastry:
  • 250g all-purpose flour
  • 50g rice flour
  • 50g tapioca or corn flour (I used tapioca)
  • 50g butter
  • 50g vegetable oil (out of supply, uses olive oil)
  • 130ml icy cold water + pinch of salt (i didn't use the salt, forgotten)


Filling:
  • 600g potato, peeled and diced (I used half potato and half sweet potato)
  • 1 large onion, diced
  • tbsps curry powder (for seafood)
  • 1 tsp tumeric
  • 2 tbsp vegetable oil
  • Some curry leaves
  • 1 cup water (+/-)
  • Salt to taste


Methods:

  1. Heat up the oil and salute the onion till it is translucent. 
  2. Add in the curry leaves and potato and slightly stir it around.
  3. Next add in the curry powder, turmeric and salt and stir the potato.
  4. Slowly add in the water, bit by bit till you reach the consistency you want, thick and the potato is soften. It should take about 7-9mins. Set it aside to cool.
  5. For the dough, mix all the flour together in a big bowl. Stir them around to mix it evenly.
  6. Heat up the butter and oil and once warm and butter melted, remove from heat.
  7. Pour the oil mixture into the flour and stir them till they mixed up properly. It should be crumbly.
  8. Next add in the cold water and knead the mixture till it forms a soft dough. Set aside and cover with a cloth and let it rest for about 15mins.
  9. Divide the dough to 24pcs and flatten them out, fill it with the fillings and shape as desire.
  10. For frying, heat up the oil and once you can see the oil movement, lower the temperature and fry till it is light brown.
  11. If Air Frying, AF at 180c for 14mins. Remember to spray some oil on the puff prior to "frying" it.